FAQ
6 FAQ
6.1 常用 debug 方法
6.1.1 利用 sunxi_dump 读写相应寄存器
需要开启 SUNXI_DUMP 模块:
使用方法:
cd /sys/class/sunxi_dump
1.查看一个寄存器
echo 0x0300b048 > dump ;cat dump
2.写值到寄存器上
echo 0x0300b058 0xfff > write ;cat write
3.查看一片连续寄存器
echo 0x0300b000,0x0300bfff > dump;cat dump

4.写一组寄存器的值
echo 0x0300b058 0xfff,0x0300b0a0 0xfff > write;cat write

通过上述方式,可以查看,修改相应gpio的寄存器,从而发现问题所在。
6.1.2 利用 sunxi_pinctrl 的 debug 节点
需要开启 DEBUG_FS:
make kernel_menuconfig
    ---> Kernel hacking
        ---> Compile-time checks and compiler options
            ---> Debug Filesystem (选中)
挂载文件节点,并进入相应目录:
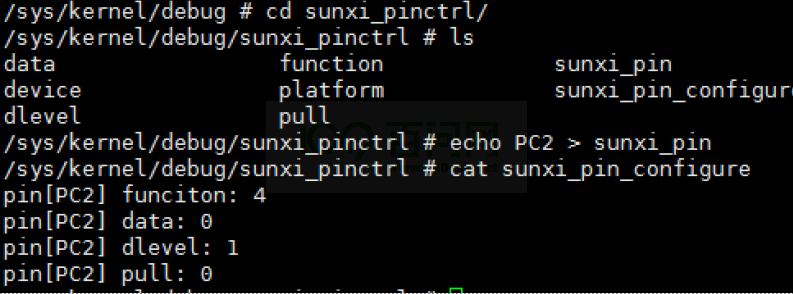
1.查看 pin 的配置:
结果如下图所示:

图 6-1: 查看 pin 配置图
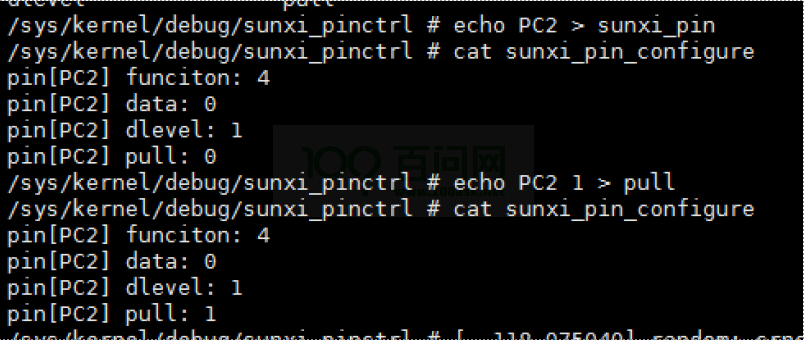
2.修改 pin 属性
每个 pin 都有四种属性,如复用 (function),数据 (data),驱动能力 (dlevel),上下拉 (pull),
修改 pin 属性的命令如下:
修改后结果如下图所示:

图 6-2: 修改结果图
注意:在 sunxi 平台,目前多个 pinctrl 的设备,分别是 pio 和 r_pio 和 axpxxx-gpio,当操作 PL 之后的 pin 时,请通过以下命令切换 pin 的设备,否则操作失败,切换命令如下:
echo pio > /sys/kernel/debug/sunxi_pinctrl/dev_name //切换到pio设备
cat /sys/kernel/debug/sunxi_pinctrl/dev_name
echo r_pio > /sys/kernel/debug/sunxi_pinctrl/dev_name //切换到r_pio设备
cat /sys/kernel/debug/sunxi_pinctrl/dev_name
修改结果如下图所示:

图 6-3: pin 设备图
6.1.3 利用 pinctrl core 的 debug 节点
1.查看 pin 的管理设备:
结果如下图所示:

图 6-4: pin 设备图
2.查看 pin 的状态和对应的使用设备
结果如下图 log 所示:
console:/sys/kernel/debug/pinctrl # ls
pinctrl-devices pinctrl-handles pinctrl-maps pio r_pio
console:/sys/kernel/debug/pinctrl # cat pinctrl-handles
Requested pin control handlers their pinmux maps:
device: twi3 current state: sleep
    state: default
        type: MUX_GROUP controller pio group: PA10 (10) function: twi3 (15)
        type: CONFIGS_GROUP controller pio group PA10 (10)config 00001409
config 00000005
        type: MUX_GROUP controller pio group: PA11 (11) function: twi3 (15)
        type: CONFIGS_GROUP controller pio group PA11 (11)config 00001409
config 00000005
    state: sleep
        type: MUX_GROUP controller pio group: PA10 (10) function: io_disabled (5)
        type: CONFIGS_GROUP controller pio group PA10 (10)config 00001409
config 00000001
        type: MUX_GROUP controller pio group: PA11 (11) function: io_disabled (5)
        type: CONFIGS_GROUP controller pio group PA11 (11)config 00001409
config 00000001
device: twi5 current state: default
    state: default
        type: MUX_GROUP controller r_pio group: PL0 (0) function: s_twi0 (3)
        type: CONFIGS_GROUP controller r_pio group PL0 (0)config 00001409
config 00000005
        type: MUX_GROUP controller r_pio group: PL1 (1) function: s_twi0 (3)
        type: CONFIGS_GROUP controller r_pio group PL1 (1)config 00001409
config 00000005
    state: sleep
        type: MUX_GROUP controller r_pio group: PL0 (0) function: io_disabled (4)
        type: CONFIGS_GROUP controller r_pio group PL0 (0)config 00001409
config 00000001
        type: MUX_GROUP controller r_pio group: PL1 (1) function: io_disabled (4)
        type: CONFIGS_GROUP controller r_pio group PL1 (1)config 00001409
config 00000001
device: soc@03000000:pwm5@0300a000 current state: active
    state: active
        type: MUX_GROUP controller pio group: PA12 (12) function: pwm5 (16)
        type: CONFIGS_GROUP controller pio group PA12 (12)config 00000001
config 00000000
config 00000000
    state: sleep
        type: MUX_GROUP controller pio group: PA12 (12) function: io_disabled (5)
        type: CONFIGS_GROUP controller pio group PA12 (12)config 00000001
config 00000000
config 00000000
device: uart0 current state: default
    state: default
    state: sleep
device: uart1 current state: default
    state: default
        type: MUX_GROUP controller pio group: PG6 (95) function: uart1 (37)
        type: CONFIGS_GROUP controller pio group PG6 (95)config 00001409
config 00000005
        type: MUX_GROUP controller pio group: PG7 (96) function: uart1 (37)
        type: CONFIGS_GROUP controller pio group PG7 (96)config 00001409
config 00000005
        type: MUX_GROUP controller pio group: PG8 (97) function: uart1 (37)
        type: CONFIGS_GROUP controller pio group PG8 (97)config 00001409
config 00000005
        type: MUX_GROUP controller pio group: PG9 (98) function: uart1 (37)
        type: CONFIGS_GROUP controller pio group PG9 (98)config 00001409
config 00000005
    state: sleep
        type: MUX_GROUP controller pio group: PG6 (95) function: io_disabled (5)
        type: CONFIGS_GROUP controller pio group PG6 (95)config 00001409
config 00000001
        type: MUX_GROUP controller pio group: PG7 (96) function: io_disabled (5)
        type: CONFIGS_GROUP controller pio group PG7 (96)config 00001409
config 00000001
        type: MUX_GROUP controller pio group: PG8 (97) function: io_disabled (5)
        type: CONFIGS_GROUP controller pio group PG8 (97)config 00001409
config 00000001
        type: MUX_GROUP controller pio group: PG9 (98) function: io_disabled (5)
        type: CONFIGS_GROUP controller pio group PG9 (98)config 00001409
....
从上面的部分 log 可以看到那些设备管理的 pin 以及 pin 当前的状态是否正确。以 twi3 设备为例,twi3 管理的 pin 有 PA10/PA11,分别有两组状态 sleep 和 default,default 状态表示使用状态,sleep 状态表示 pin 处于 io disabled 状态,表示 pin 不可正常使用,twi3 设备使用的 pin 当前状态处于 sleep 状态的。
6.1.4 GPIO 中断问题排查步骤
6.1.4.1 GPIO 中断一直响应
-
排查中断信号是否一直触发中断
-
利用 sunxi_dump 节点,确认中断 pending 位是否没有清 (参考 6.1.1 小节)
-
是否在 gpio 中断服务程序里对中断检测的 gpio 进行 pin mux 的切换,不允许这样切换,否则会导致中断异常
6.1.4.2 GPIO 检测不到中断
-
排查中断信号是否正常,若不正常,则排查硬件,若正常,则跳到步骤 2
-
利用 sunxi_dump 节点,查看 gpio 中断 pending 位是否置起,若已经置起,则跳到步骤5,否则跳到步骤 3
-
利用 sunxi_dump 节点,查看 gpio 的中断触发方式是否配置正确,若正确,则跳到步骤 4,否则跳到步骤 5
-
检查中断的采样时钟,默认应该是 32k,可以通过 sunxi_dump 节点,切换 gpio 中断采样时钟到 24M 进行实验
-
利用 sunxi_dump,确认中断是否使能